Python
Overview
Multiple versions of Python are installed in Genkai. You can use them without loading a module.
The main ones available are as follows.
|
version |
Python command/pip command |
|---|---|
|
Python 3.6 |
python3/pip3 |
|
Python 3.8 |
python3.8/pip3.8 |
|
Python 3.9 |
python3.9/pip3.9 |
|
Python 3.11 |
python3.11/pip3.11 |
In addition, Intel Python is also available. To use Intel Python, load the intel module (module load intel) and then load the intelpython module (module load intelpython).
Examples of Python commands available for login nodes:
[ku40000105@genkai0002 ~]$ python (Interpolate commands with the Tab key)
  python                    python2-debug-config      python3.6m-config         python3.9
  python2                   python3                   python3.6m-x86_64-config  python3.9-config
  python2.7                 python3.11                python3.8                 python3.9-x86_64-config
  python2.7-config          python3.11-config         python3.8-config          python3-config
  python2.7-debug           python3.11-x86_64-config  python3.8d                python3-flake8
  python2.7-debug-config    python3.6                 python3.8d-config         python3-pyflakes
  python2-config            python3.6-config          python3.8d-x86_64-config  python-debug
  python2-debug             python3.6m                python3.8-x86_64-config   python-debug-config
[ku40000105@genkai0002 ~]$ python
Adding packages and modules at the user level
You can add packages and modules to Python by using the pip command (pip3, etc.), but since Genkai is a shared environment, please add the --user option. This allows packages to be installed under the home directory of each user. (If you do not add the --user option, it will try to install to the system directory and give an error.)
Example of a command to install a package or module into a user directory:
[ku40000105@genkai0002 ~]$ pip install --user package_name
If you use the virtual environment described below, you do not need to add the --user option because it will run/update Python installed in the user directory instead of the system directory.
Using Virtual Environments
You may want to use a specific version of Python or switch between Python versions or Python module installations to match the software you are using. In such cases, consider using venv, pyenv, Miniforge, etc.
When executing programs or modules maintained by the virtual environment in a batch job, be sure to activate the virtual environment in the batch job script as well.
How to use venv
venv is a Python virtual environment. Using a virtual environment allows you to prepare packages and modules for each virtual environment, so it is convenient to prepare a separate virtual environment for each project or application and switch between them.
How to create a virtual environment (example using Python 3.6)
Create a virtual environment with this command.
python3.6 -mvenv virtual_environment_name
When the command is executed, the directory specified by the virtual environment name is created on the spot. When activating it, you will access the files in it, so please be careful about the directory relationship when creating and activating the virtual environment.
How to activate/terminate use of a virtual environment
The
source virtual_environment_name/bin/activate
command activates the virtual environment, and the
deactivate
command terminates its use.
Example of use
# Create virtual environment
# (in this example, the test1 environment is created in the venv subdirectory under the home directory)
[ku40000105@genkai0001 ~]$ python3.6 -mvenv venv/test1
# Enable virtual environment
[ku40000105@genkai0001 ~]$ source venv/test1/bin/activate
# The display "(test1)" is added to the beginning of the line because test1 is activated
(test1) [ku40000105@genkai0001 ~]$
# If you use commands such as python or pip in this state,
# the ones in the virtual environment will take precedence
(test1) [ku40000105@genkai0001 ~]$ which python
~/venv/test1/bin/python
(test1) [ku40000105@genkai0001 ~]$ which pip
~/venv/test1/bin/pip
(test1) [ku40000105@genkai0001 ~]$ python --version
Python 3.6.8
(test1) [ku40000105@genkai0001 ~]$ pip --version
pip 9.0.3 from /home/pj24001603/ku40000105/venv/test1/lib64/python3.6/site-packages (python 3.6)
# You do not need to add `--user` to the pip install command when virtual environment is enabled
# (it will be installed under the virtual environment directory)
(test1) [ku40000105@genkai0001 ~]$ pip install pandas
Collecting pandas
(snip)
Installing collected packages: pytz, numpy, six, python-dateutil, pandas
Successfully installed numpy-1.19.5 pandas-1.1.5 python-dateutil-2.9.0.post0 pytz-2024.1 six-1.16.0
You are using pip version 9.0.3, however version 24.0 is available.
You should consider upgrading via the 'pip install --upgrade pip' command.
# When you finish using the virtual environment,
# (test1) will disappear and commands such as python, pip, etc.
# will return to the state where the system ones take precedence
(test1) [ku40000105@genkai0001 ~]$ deactivate
[ku40000105@genkai0001 ~]$ which python
/usr/bin/python
[ku40000105@genkai0001 ~]$ which pip
/usr/bin/which: no pip in (snip)
[ku40000105@genkai0001 ~]$
How to use pyenv
pyenv allows you to coexist (switch between) multiple Python versions. Consider using pyenv when you want to use a Python version other than the one already installed.
Installation
To install pyenv, execute the following command. This will place the necessary files in the ~/.pyenv directory.
[ku40000105@genkai0002 ~]$ curl https://pyenv.run | bash
Add the following to the end of the .bashrc so that pyenv is invoked at login. (If you are using a shell other than BASH, please adapt accordingly.)
export PYENV_ROOT="$HOME/.pyenv"
[[ -d $PYENV_ROOT/bin ]] && export PATH="$PYENV_ROOT/bin:$PATH"
eval "$(pyenv init -)"
eval "$(pyenv virtualenv-init -)"
When you log in again (start the shell again) with the .bashrc modified, the pyenv command will be available. At this point, the Python command will switch to the Python included in pyenv.
[ku40000105@genkai0002 ~]$ which python
~/.pyenv/shims/python
[ku40000105@genkai0002 ~]$ python --version
Python 3.6.8
[ku40000105@genkai0002 ~]$
Get a list of Python versions available for installation
You can get a list of Python versions available for installation by running pyenv install --list. (Many versions will be displayed.)
[ku40000105@genkai0002 ~]$ pyenv install --list
Available versions:
  2.1.3
  2.2.3
(snip)
  stackless-3.5.4
  stackless-3.7.5
[ku40000105@genkai0002 ~]$
Installing/Uninstalling a specified version of Python
You can install a specific version of Python by running pyenv install target version. (For the target version, choose the desired one from those listed with pyenv install --list.)
[ku40000105@genkai0002 ~]$ pyenv install 3.12.0
Downloading Python-3.12.0.tar.xz...
-> https://www.python.org/ftp/python/3.12.0/Python-3.12.0.tar.xz
Installing Python-3.12.0...
Installed Python-3.12.0 to /home/pj24001603/ku40000105/.pyenv/versions/3.12.0
[ku40000105@genkai0002 ~]$
You can uninstall the installed Python by running pyenv uninstall target_version.
Get a list of installed Python versions
You can get a list of installed Python versions by running pyenv versions.
- Immediately after installing pyenv
[ku40000105@genkai0002 ~]$ pyenv versions
* system (set by /home/pj24001603/ku40000105/.pyenv/version)
[ku40000105@genkai0002 ~]$
- After installing 3.12.0
[ku40000105@genkai0002 ~]$ pyenv versions
* system (set by /home/pj24001603/ku40000105/.pyenv/version)
  3.12.0
[ku40000105@genkai0002 ~]$
The one with an asterisk ( * ) at the beginning is the Python you are currently using.
Switching which Python to use
You can switch which Python to use by running pyenv local environment_name or pyenv global environment_name. Use local if you want to use the specified Python only in a specific directory, and use global otherwise (not limited to a specific directory). Python information will be inherited even if you log in again. (The Python information is stored in ~/.pyenv/version for global and in the .python-version file for local.)
[ku40000105@genkai0001 ~]$ which python
~/.pyenv/shims/python
[ku40000105@genkai0001 ~]$ python --version
Python 3.6.8
[ku40000105@genkai0001 ~]$ pyenv versions
* system (set by /home/pj24001603/ku40000105/.pyenv/version)
  3.12.0
# pyenv global to switch Python
[ku40000105@genkai0001 ~]$ pyenv global 3.12.0
[ku40000105@genkai0001 ~]$ which python
~/.pyenv/shims/python
[ku40000105@genkai0001 ~]$ python --version
Python 3.12.0
[ku40000105@genkai0001 ~]$ pyenv versions
  system
* 3.12.0 (set by /home/pj24001603/ku40000105/.pyenv/version)
# Python path has not changed, but the version of Python running has changed to 3.12.0
# (pyenv versions will show * for the currently active Python)
[ku40000105@genkai0001 ~]$ logout
# Logged out of Genkai.

# Loged back in to Genkai.
$ ssh genkai
[ku40000105@genkai0001 ~]$ python --version
Python 3.12.0
[ku40000105@genkai0001 ~]$ pyenv versions
  system
* 3.12.0 (set by /home/pj24001603/ku40000105/.pyenv/version)
# Python was still 3.12.0 when logged back in
# To revert back, enable system
[ku40000105@genkai0001 ~]$ pyenv global system
[ku40000105@genkai0001 ~]$ python --version
Python 3.6.8
[ku40000105@genkai0001 ~]$ pyenv versions
* system (set by /home/pj24001603/ku40000105/.pyenv/version)
  3.12.0
[ku40000105@genkai0001 ~]$
Create and use a new Python environment.
You can create a new Python environment by running pyenv virtualenv installed_Python_version_number environment_name. You can use pyenv activate environment_name to switch to the new environment. You can exit using pyenv deactivate. You can use pyenv deactivate if you want to use the same Python version but with different package configurations. (Please Use pyenv and venv as you like.)
# Create a new environment based on 3.12.0
[ku40000105@genkai0002 ~]$ pyenv virtualenv 3.12.0 test_3.12.0
# Activate the created environment
[ku40000105@genkai0001 ~]$ pyenv activate test_3.12.0
# actiavted environment name is displayed at the beginning of the line
(test_3.12.0) [ku40000105@genkai0001 ~]$
# deactivate to end use
(test_3.12.0) [ku40000105@genkai0001 ~]$ pyenv deactivate
[ku40000105@genkai0001 ~]$
How to use Miniforge
Miniforge is a tool (package management software, environment management system) for managing software applications that include Python. The mamba command is used to manage the virtual environment, etc. Similar tools exist such as conda (Miniconda, Anaconda).
Miniforge includes both conda and mamba, two programs with almost similar functionality. Since mamba is like a faster version of conda, we recommend using mamba if you have no particular preference.
Installing Miniforge
Download and run the installation script. In this example, the installation directory is ~/miniforge3.
(The -b -u -p ~/miniforge3 option has been added so that interactive confirmations such as where to install are omitted.)
[ku40005108@genkai0002 ~]$ wget "https://github.com/conda-forge/miniforge/releases/latest/download/Miniforge3-$(uname)-$(uname -m).sh"
[ku40005108@genkai0002 ~]$ bash ./Miniforge3-Linux-x86_64.sh -b -u -p ~/miniforge3
PREFIX=/home/jh250083/ku40005108/miniforge3
Unpacking payload ...
Extracting _libgcc_mutex-0.1-conda_forge.tar.bz2
Extracting ca-certificates-2025.4.26-hbd8a1cb_0.conda
Extracting ld_impl_linux-64-2.43-h712a8e2_4.conda
(snip)
Transaction starting
Transaction finished
To activate this environment, use:
micromamba activate /home/jh250083/ku40005108/miniforge3
Or to execute a single command in this environment, use:
micromamba run -p /home/jh250083/ku40005108/miniforge3 mycommand
installation finished.
[ku40005108@genkai0002 ~]$
After installation, the following command will display (base) at the beginning of the line.
eval "$(~/miniforge3/bin/conda shell.bash hook)"
In this state, the mamba command becomes available after executing this command.
. ~/miniforge3/etc/profile.d/mamba.sh
Additionally, running the mamba init command updates your Bash configuration file, making the mamba command available immediately after logging in. However, please be aware that this may slightly increase your login time and could cause side effects due to Miniforge starting automatically. (Depending on the jobs you run, this may have a negative impact.)
Basic usage of Miniforge
With mamba, you can create and switch new Python runtime environment. Python modules and software are prepared separately for each Python runtime environment, so you can switch between them to use different versions of software and avoid software conflicts.
To create an environment, use this command.
mamba create -n environment_name modules_to_be_installed_at_the_same_time
When creating, you can also specify the Python version to use as follows.
mamba create -n environment_name python=version_number
Activating the created environment is done with this command.
mamba activate name_of_environmen_to_activate
To deactivate, use this command.
mamba deactivate
List created environments with this command.
mamba info -e
Miniforge Usage Example
# The Python to be executed remains the same when mamba is ready for use.
[ku40005108@genkai0002 ~]$ which python
/usr/bin/python
[ku40005108@genkai0002 ~]$ python -V
Python 3.6.8
# The base environment is created by default.
[ku40005108@genkai0002 ~]$ mamba info -e
Name  Active  Path
──────────────────────────────────────────────────────
base  *       /home/jh250083/ku40005108/miniforge3
# If you activate, you can use the base environment, and the Python path will be switched.
[ku40005108@genkai0002 ~]$ mamba activate base
(base) [ku40005108@genkai0002 ~]$ which python
~/miniforge3/bin/python
(base) [ku40005108@genkai0002 ~]$ python -V
Python 3.12.10
# If you deactivate it, it will be restored.
(base) [ku40005108@genkai0002 ~]$ mamba deactivate
[ku40005108@genkai0002 ~]$ which python
/usr/bin/python
[ku40005108@genkai0002 ~]$ python -V
Python 3.6.8
# Create environment (if -y is not added, the contents will be checked for correctness)
[ku40005108@genkai0002 ~]$ mamba create -n test_3.12.0 python=3.12.0 pip -y
conda-forge/noarch                                  20.4MB @  35.8MB/s  0.5s
conda-forge/linux-64                                44.0MB @  60.6MB/s  0.6s


Transaction

  Prefix: /home/jh250083/ku40005108/miniforge3/envs/test_3.12.0

  Updating specs:

   - python=3.12.0
   - pip
(snip)
Transaction finished


To activate this environment, use:

    mamba activate test_3.12.0

Or to execute a single command in this environment, use:

    mamba run -n test_3.12.0 mycommand

[ku40005108@genkai0002 ~]$ mamba info -e
  Name         Active  Path
──────────────────────────────────────────────────────────────────────────────
  base         *       /home/jh250083/ku40005108/miniforge3
  test_3.12.0          /home/jh250083/ku40005108/miniforge3/envs/test_3.12.0
# Activate the created environment.
[ku40005108@genkai0002 ~]$ mamba activate test_3.12.0
# The name of the activated environment appears at the beginning of the line,
# and the installed Python is ready to use.
(test_3.12.0) [ku40005108@genkai0002 ~]$ which python
~/miniforge3/envs/test_3.12.0/bin/python
(test_3.12.0) [ku40005108@genkai0002 ~]$ python -V
Python 3.12.0
# Check the installed modules.
(test_3.12.0) [ku40005108@genkai0002 ~]$ pip list
Package    Version
---------- -------
pip        25.1.1
setuptools 80.1.0
wheel      0.45.1
# Install the pandas module as a trial.
# (The --user option is not necessary since it is installed in the virtual environment.)
(test_3.12.0) [ku40005108@genkai0002 ~]$ pip install pandas
Collecting pandas
  Downloading pandas-2.2.3-cp312-cp312-manylinux_2_17_x86_64.manylinux2014_x86_64.whl.metadata (89 kB)
Collecting numpy>=1.26.0 (from pandas)
  Downloading numpy-2.2.6-cp312-cp312-manylinux_2_17_x86_64.manylinux2014_x86_64.whl.metadata (62 kB)
Collecting python-dateutil>=2.8.2 (from pandas)
  Downloading python_dateutil-2.9.0.post0-py2.py3-none-any.whl.metadata (8.4 kB)
Collecting pytz>=2020.1 (from pandas)
  Downloading pytz-2025.2-py2.py3-none-any.whl.metadata (22 kB)
Collecting tzdata>=2022.7 (from pandas)
  Downloading tzdata-2025.2-py2.py3-none-any.whl.metadata (1.4 kB)
Collecting six>=1.5 (from python-dateutil>=2.8.2->pandas)
  Downloading six-1.17.0-py2.py3-none-any.whl.metadata (1.7 kB)
Downloading pandas-2.2.3-cp312-cp312-manylinux_2_17_x86_64.manylinux2014_x86_64.whl (12.7 MB)
   ━━━━━━━━━━━━━━━━━━━━━━━━━━━━━━━━━━━━━━━━ 12.7/12.7 MB 111.3 MB/s eta 0:00:00
Downloading numpy-2.2.6-cp312-cp312-manylinux_2_17_x86_64.manylinux2014_x86_64.whl (16.5 MB)
   ━━━━━━━━━━━━━━━━━━━━━━━━━━━━━━━━━━━━━━━━ 16.5/16.5 MB 161.3 MB/s eta 0:00:00
Downloading python_dateutil-2.9.0.post0-py2.py3-none-any.whl (229 kB)
Downloading pytz-2025.2-py2.py3-none-any.whl (509 kB)
Downloading six-1.17.0-py2.py3-none-any.whl (11 kB)
Downloading tzdata-2025.2-py2.py3-none-any.whl (347 kB)
Installing collected packages: pytz, tzdata, six, numpy, python-dateutil, pandas
Successfully installed numpy-2.2.6 pandas-2.2.3 python-dateutil-2.9.0.post0 pytz-2025.2 six-1.17.0 tzdata-2025.2
# Check the installed modules and you will see more pandas, etc.
(test_3.12.0) [ku40005108@genkai0002 ~]$ pip list
Package         Version
--------------- -----------
numpy           2.2.6
pandas          2.2.3
pip             25.1.1
python-dateutil 2.9.0.post0
pytz            2025.2
setuptools      80.1.0
six             1.17.0
tzdata          2025.2
wheel           0.45.1
# Disables the activated environment.
(test_3.12.0) [ku40005108@genkai0002 ~]$ mamba deactivate
[ku40005108@genkai0002 ~]$
# Remove the unnecessary environment.
[ku40005108@genkai0002 ~]$ mamba env remove -n test_3.12.0
Do you want to remove the environment?: [y/n] y
Environment removed at prefix: /home/pj25000083/ku40005108/miniforge3/envs/test_3.12.0
[ku40005108@genkai0002 ~]$ mamba info -e
  Name         Active  Path
──────────────────────────────────────────────────────────────────────────────
  base         *       /home/jh250083/ku40005108/miniforge3
[ku40005108@genkai0002 ~]$
Important Notes when using mamba in a batch job
If you try to use mamba within a batch job, you may encounter an error stating that mamba init has not been completed.
In this case, try adding -l to the first line of your batch job script.
[ku40000105@genkai0001 ~]$ cat test.sh.5686136.out
Run 'mamba init' to be able to run mamba activate/deactivate
and start a new shell session. Or use conda to activate/deactivate.

Python 3.6.8
#!/bin/bash -l
#PJM -L rscgrp=a-batch
#PJM -L vnode-core=4
#PJM -L elapse=10:00
#PJM -j

mamba activate testenv_py312
python --version
[ku40000105@genkai0001 ~]$ cat test.sh.5686131.out
Python 3.11.2
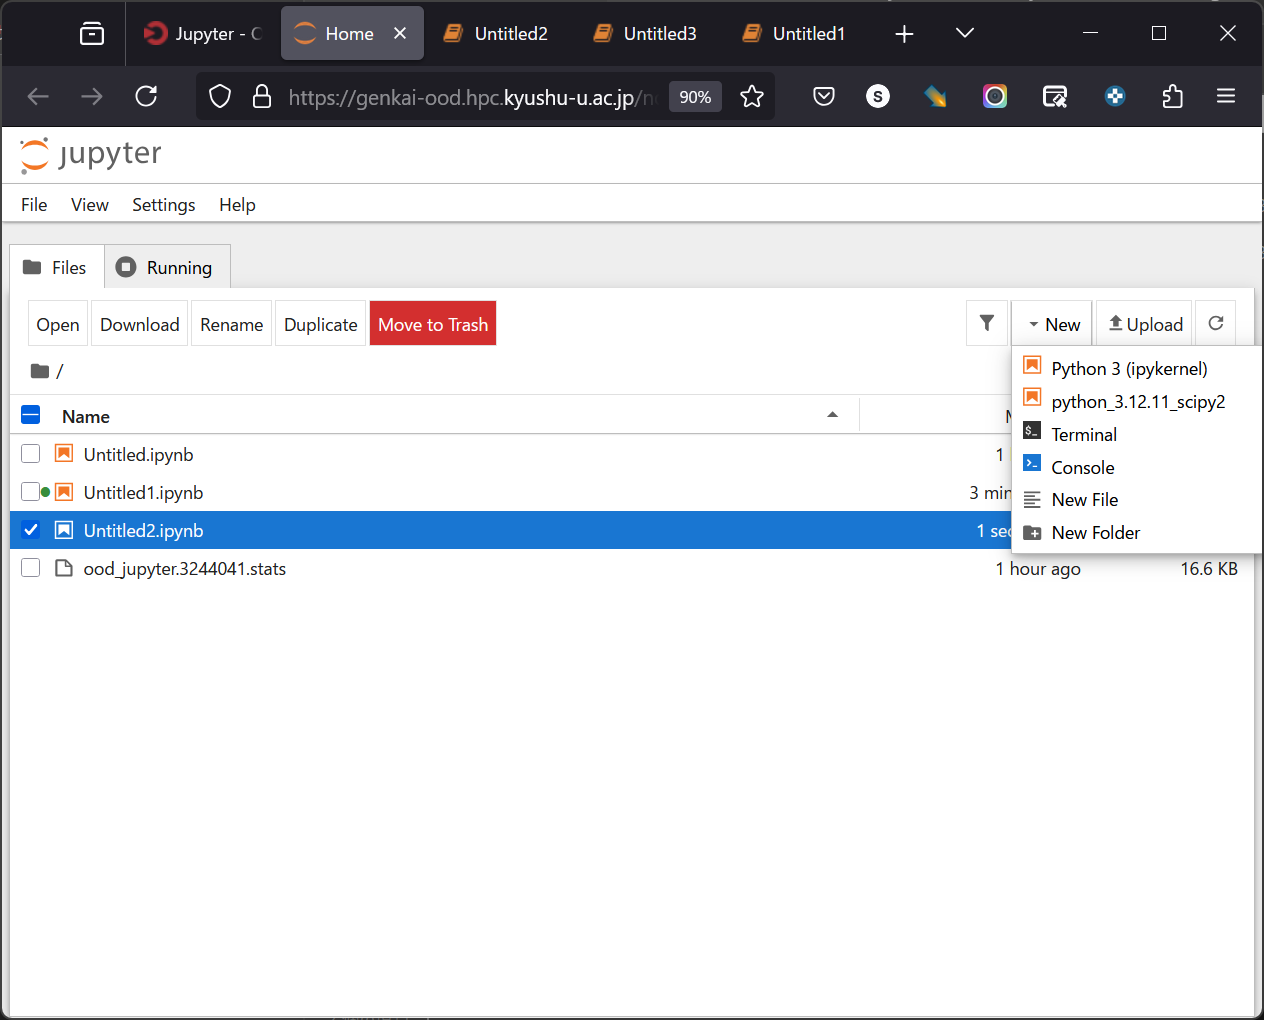
How to use the Python virtual environment on Jupyter
Outline of the procedure
- prepare a virtual environment
- register the virtual environment to OOD using the ipython command
- start the registered virtual environment on OOD
example
- prepare a virtual environment
Prepare a virtual environment according to the Python version available on OOD.
(It is possible that the versions do not have to match up to the finest version, but it has not been confirmed how much difference is acceptable.)
The ipykernel package must be installed in the virtual environment.
It would be easier to install ipykernel together at the time of mamba create, but it can be added later with the pip command.
The following is an example of creating a new virtual environment including scipy and ipykernel.
[ku40000105@genkai0001 ~]$ mamba create -n test_3.12.11_scipy2 python=3.12.11 pip scipy ipykernel

Looking for: ['python=3.12.11', 'pip', 'scipy', 'ipykernel']
(omit)
  Prefix: /home/pj24001603/ku40000105/miniforge3/envs/test_3.12.11_scipy2

  Updating specs:
   - python=3.12.11
   - pip
   - scipy
   - ipykernel
(omit)
[ku40000105@genkai0001 ~]$ mamba info -e

          mamba version : 1.5.12
# conda environments:
#
base                   /home/pj24001603/ku40000105/miniforge3
test_3.12.11_scipy2    /home/pj24001603/ku40000105/miniforge3/envs/test_3.12.11_scipy2
- register the virtual environment to OOD using ipython command
With the virtual environment you want to register enabled, register the virtual environment using the ipython command.
The name specified in the --name argument will appear in the kernel list on Jupyter.
[ku40000105@genkai0001 ~]$ mamba activate test_3.12.11_scipy2
(test_3.12.11_scipy2) [ku40000105@genkai0001 ~]$ ipython kernel install --user --name=python_3.12.11_scipy2
Installed kernelspec python_3.12.11_scipy2 in /home/pj24001603/ku40000105/.local/share/jupyter/kernels/python_3.12.11_scipy2
(test_3.12.11_scipy2) [ku40000105@genkai0001 ~]$ jupyter kernelspec list
Available kernels:
  python3                  /home/pj24001603/ku40000105/miniforge3/envs/test_3.12.11_scipy2/share/jupyter/kernels/python3
  jupyter_py3.11           /home/pj24001603/ku40000105/.local/share/jupyter/kernels/jupyter_py3.11
  python_3.12.11_scipy2    /home/pj24001603/ku40000105/.local/share/jupyter/kernels/python_3.12.11_scipy2
The jupyter command is used to remove registered virtual environments.
(test_3.12.11_scipy2) [ku40000105@genkai0001 ~]$ jupyter kernelspec uninstall jupyter_py3.11
Kernel specs to remove:
  jupyter_py3.11        /home/pj24001603/ku40000105/.local/share/jupyter/kernels/jupyter_py3.11
Remove 1 kernel specs [y/N]: y
Removed /home/pj24001603/ku40000105/.local/share/jupyter/kernels/jupyter_py3.11
(test_3.12.11_scipy2) [ku40000105@genkai0001 ~]$ jupyter kernelspec list
Available kernels:
  python3                  /home/pj24001603/ku40000105/miniforge3/envs/test_3.12.11_scipy2/share/jupyter/kernels/python3
  python_3.12.11_scipy2    /home/pj24001603/ku40000105/.local/share/jupyter/kernels/python_3.12.11_scipy2
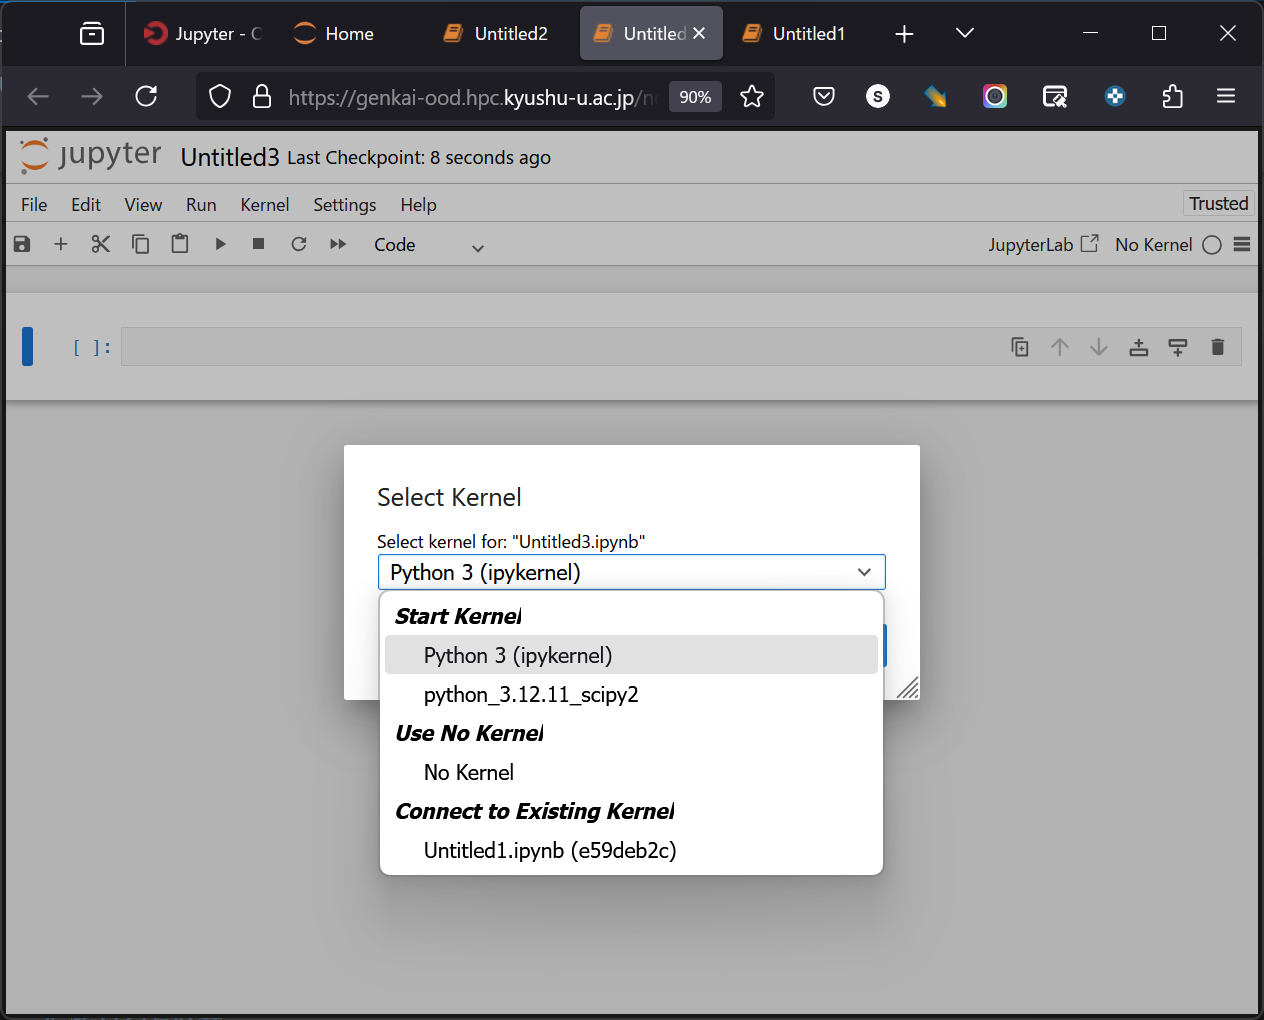
- start the registered virtual environment on OOD
Start OOD by specifying the Python version for the registered environment.
After startup, you can select the registered virtual environment from the Notebook startup menu, so select it and start it.
Since scipy is installed, it can be confirmed that scipy-related processing can be performed.
It can be confirmed that module loading is not possible because pandas is not installed.
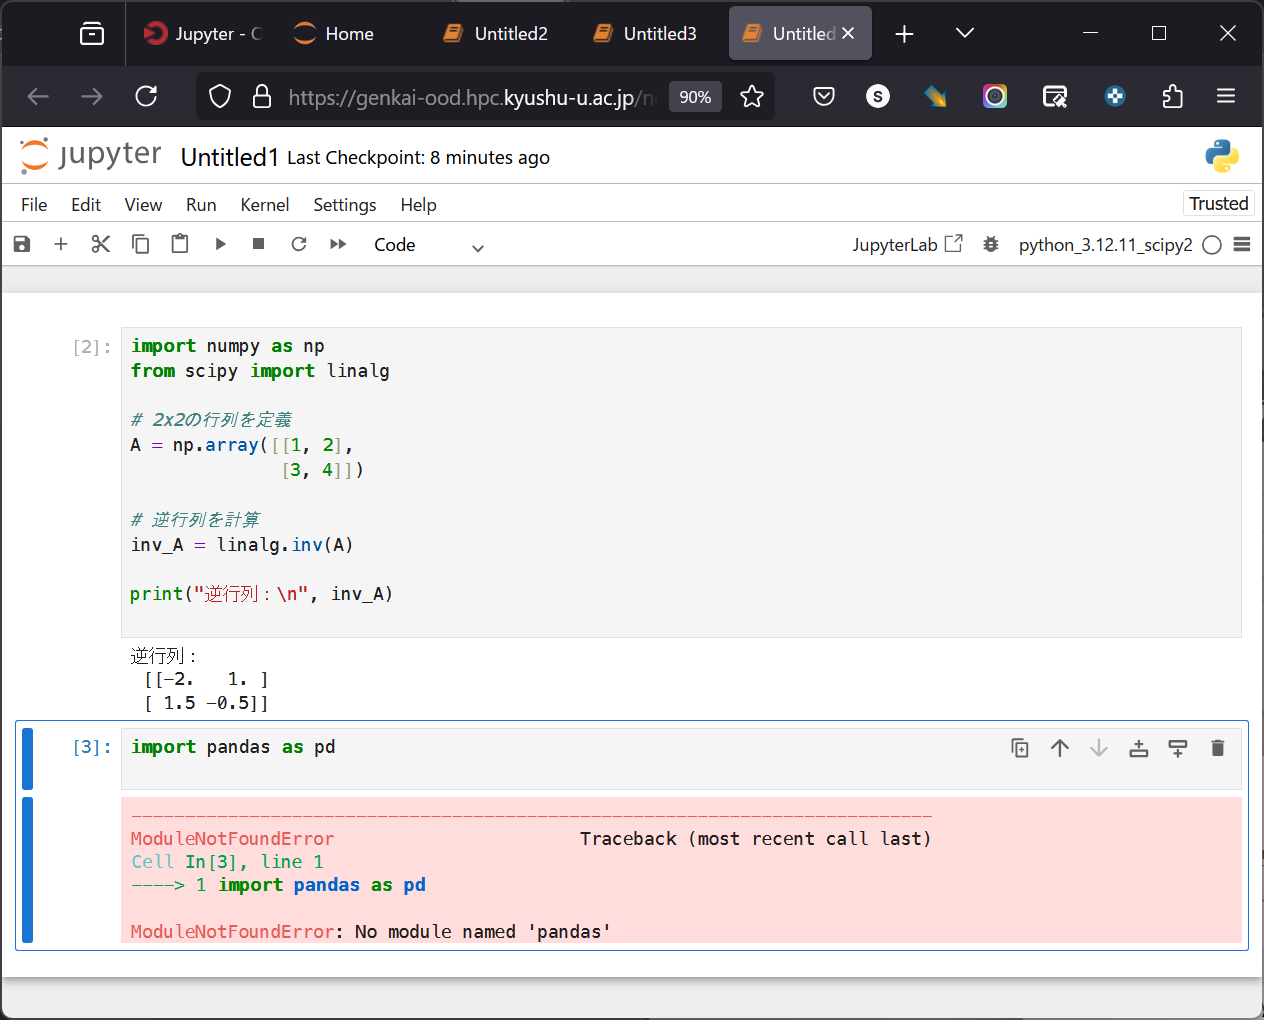
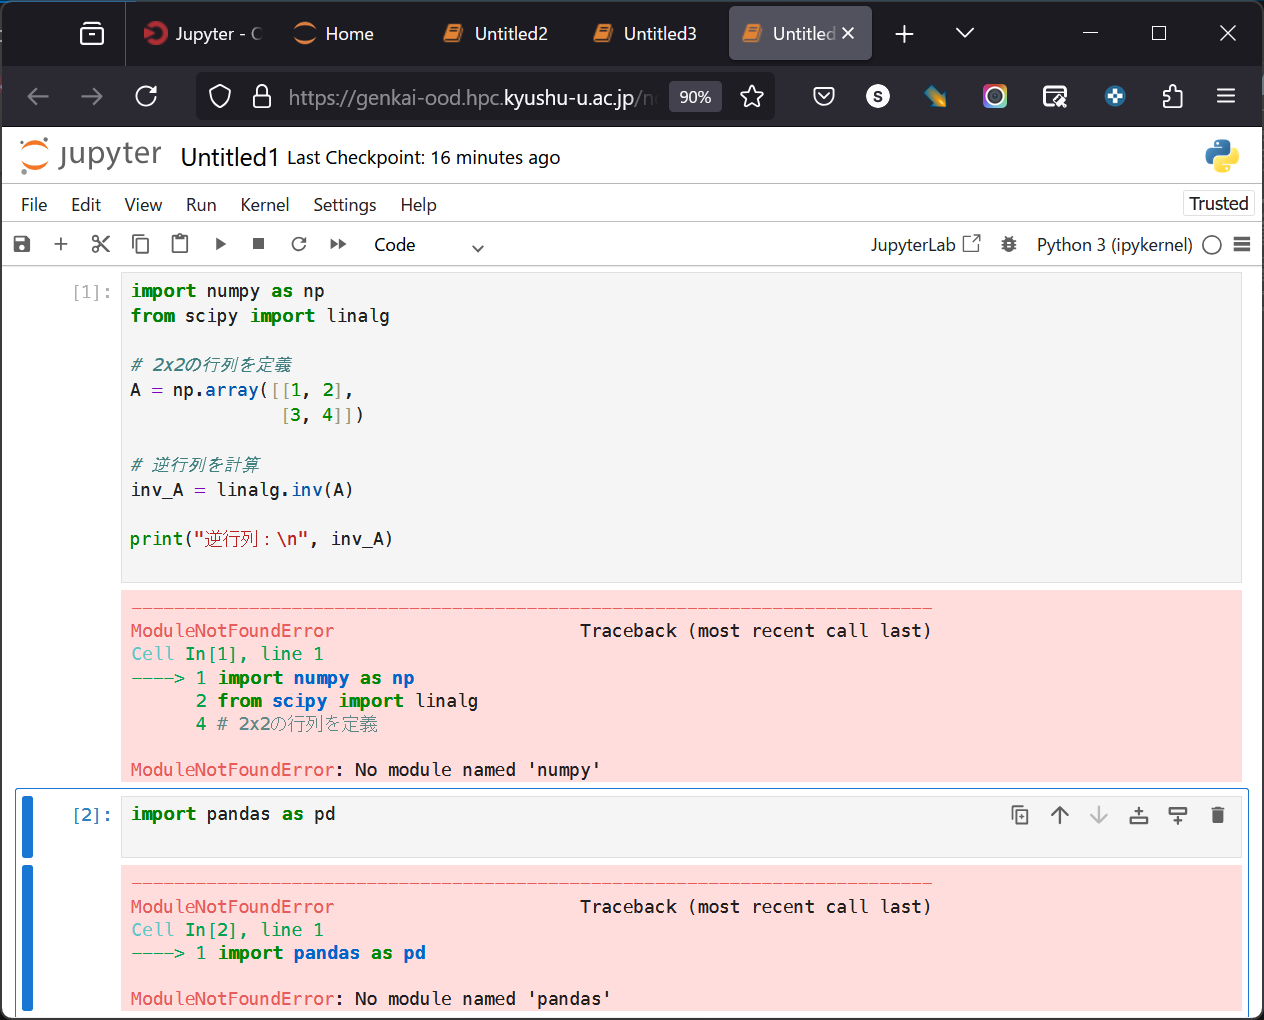
Note that neither scipy nor pandas is installed in the environment available from the beginning (Python 3 (ipykernel)), so neither module can be loaded and an error occurs.
This confirms that the virtual environment created in the above example was indeed usable.
How to Use uv
uv is a useful tool for quickly switching between Python virtual environments.
Compared to conda/mamba,
it allows you to use it without cluttering your .bashrc file and makes it easy to place environment configuration files in a local directory.
How to Install uv
Running
curl -LsSf https://astral.sh/uv/install.sh | sh
will install
$HOME/.local/bin/uv and
$HOME/.local/bin/uvx.
(The $HOME/.local/bin directory should already be in your PATH when you start using Genkai.)
- Installation Example
[ku40000105@genkai0001 ~]$ ls ~/.local/bin|grep uv
[ku40000105@genkai0001 ~]$ curl -LsSf https://astral.sh/uv/install.sh | sh
downloading uv 0.11.7 x86_64-unknown-linux-gnu
installing to /home/pj24001603/ku40000105/.local/bin
  uv
  uvx
everything's installed!
[ku40000105@genkai0001 ~]$ ls ~/.local/bin|grep uv
uv*
uvx*
[ku40000105@genkai0001 ~]$ uv --version
uv 0.11.7 (x86_64-unknown-linux-gnu)
How to Use uv (Switching Python Environments)
Running uv venv
creates a .venv directory in the current directory and sets up a new Python virtual environment.
If you specify a Python version like
uv venv --python 3.11
, you can create a virtual environment compatible with that version.
Running
source .venv/bin/activate
activates the virtual environment.
In this state, running
python
will execute the Python command for the specified version.
You can install Python packages without affecting other environments.
Use the
deactivate
command to deactivate the virtual environment,
and simply delete the entire directory when the virtual environment is no longer needed.
[ku40000105@genkai0001 ~]$ uv --version
uv 0.11.7 (x86_64-unknown-linux-gnu)
[ku40000105@genkai0001 ~]$ which python
/usr/bin/python
[ku40000105@genkai0001 ~]$ python --version
Python 3.6.8
[ku40000105@genkai0001 ~]$ mkdir uv3.11
[ku40000105@genkai0001 ~]$ cd uv3.11
[ku40000105@genkai0001 uv3.11]$ uv venv --python 3.11                                                                                                                Using CPython 3.11.13 interpreter at: /usr/bin/python3.11                                                                                                            Creating virtual environment at: .venv
Activate with: source .venv/bin/activate
[ku40000105@genkai0001 uv3.11]$ source .venv/bin/activate
(uv3.11) [ku40000105@genkai0001 uv3.11]$ python --version 3.11
Python 3.11.13
(uv3.11) [ku40000105@genkai0001 uv3.11]$ deactivate
[ku40000105@genkai0001 uv3.11]$
[ku40000105@genkai0001 uv3.11]$ python --version
Python 3.6.8
When installing packages within a virtual environment, use uv pip instead of pip.
(pip is not installed within the virtual environment.)
# If you try to run the `pip` command directly, the pip outside the virtual environment (the standard pip) will be used.
# If you run `pip list` here, the list of packages for the standard Python installation will be displayed.
(uv3.11) [ku40000105@genkai0001 uv3.11]$ which pip
~/.local/bin/pip
# Running `uv pip list` confirms that there are no packages in the current virtual environment yet
(uv3.11) [ku40000105@genkai0001 uv3.11]$ uv pip list
# You can install packages using `uv pip install`
(uv3.11) [ku40000105@genkai0001 uv3.11]$ uv pip install pandas
Resolved 4 packages in 1.60s
Prepared 4 packages in 1.83s
Installed 4 packages in 1.27s
 + numpy==2.4.4
 + pandas==3.0.2
 + python-dateutil==2.9.0.post0
 + six==1.17.0
(uv3.11) [ku40000105@genkai0001 uv3.11]$ uv pip list
Package         Version
--------------- -----------
numpy           2.4.4
pandas          3.0.2
python-dateutil 2.9.0.post0
six             1.17.0
(uv3.11) [ku40000105@genkai0001 uv3.11]$
You can also run a Python environment that is not currently activated using the uv run command.
(uv3.11) [ku40000105@genkai0001 uv3.11]$ deactivate
[ku40000105@genkai0001 uv3.11]$ uv run python --version
Python 3.11.13
[ku40000105@genkai0001 uv3.11]$
Of course, you can also use it when running batch jobs.
[ku40000105@genkai0001 uv3.11]$ cat test1.sh
#!/bin/bash -l
#PJM -L rscgrp=a-batch
#PJM -L vnode-core=4
#PJM -L elapse=10:00
#PJM -j

source .venv/bin/activate
python --version

[ku40000105@genkai0001 uv3.11]$ cat test1.sh.5686167.out
Python 3.11.2
[ku40000105@genkai0001 uv3.11]$ cat test2.sh
#!/bin/bash
#PJM -L rscgrp=a-batch
#PJM -L vnode-core=4
#PJM -L elapse=10:00
#PJM -j

uv run python --version

[ku40000105@genkai0001 uv3.11]$ cat test2.sh.5686165.out
Python 3.11.2
How to Use a Python Virtual Environment in Jupyter Notebook
By using ipykernel, you can use the virtual environment you created within Jupyter Notebook.
The steps (example) are shown below.
# Create and activate the virtual environment
[ku40000105@genkai0001 python3.12]$ uv venv --python 3.12
Using CPython 3.12.11
Creating virtual environment at: .venv
Activate with: source .venv/bin/activate
[ku40000105@genkai0001 python3.12]$ source .venv/bin/activate
# Install ipykernel
(python3.12) [ku40000105@genkai0001 python3.12]$ uv pip install ipykernel
Resolved 29 packages in 1.08s
Prepared 4 packages in 275ms
Installed 29 packages in 2.47s
 + asttokens==3.0.1
 + comm==0.2.3
 + debugpy==1.8.20
 + decorator==5.2.1
 + executing==2.2.1
 + ipykernel==7.2.0
 + ipython==9.13.0
 + ipython-pygments-lexers==1.1.1
 + jedi==0.19.2
 + jupyter-client==8.8.0
 + jupyter-core==5.9.1
 + matplotlib-inline==0.2.1
 + nest-asyncio==1.6.0
 + packaging==26.2
 + parso==0.8.6
 + pexpect==4.9.0
 + platformdirs==4.9.6
 + prompt-toolkit==3.0.52
 + psutil==7.2.2
 + ptyprocess==0.7.0
 + pure-eval==0.2.3
 + pygments==2.20.0
 + python-dateutil==2.9.0.post0
 + pyzmq==27.1.0
 + six==1.17.0
 + stack-data==0.6.3
 + tornado==6.5.5
 + traitlets==5.14.3
 + wcwidth==0.6.0
# Register a virtual environment using ipykernel. The name specified for `name` is for administrative purposes, while the name specified for `display-name` will be displayed in Jupyter Notebook.
(python3.12) [ku40000105@genkai0001 python3.12]$ python -m ipykernel install --user --name=uv3.12 --display-name=“Python uv3.12”
Installed kernelspec uv3.12 in /home/pj24001603/ku40000105/.local/share/jupyter/kernels/uv3.12
# You can verify the name specified in `name` by viewing the list
(python3.12) [ku40000105@genkai0001 python3.12]$ jupyter kernelspec list
Available kernels:
  python3                  /home/pj24001603/ku40000105/work/tmp/python3.12/.venv/share/jupyter/kernels/python3
  uv3.12                   /home/pj24001603/ku40000105/.local/share/jupyter/kernels/uv3.12

If you open Jupyter Notebook in this state, “Python uv3.12” should appear in the kernel list.

# You can remove it using `uninstall`
(python3.12) [ku40000105@genkai0001 python3.12]$ jupyter kernelspec uninstall uv3.12
Kernel specs to remove:
  uv3.12                /home/pj24001603/ku40000105/.local/share/jupyter/kernels/uv3.12
Remove 1 kernel spec [y/N]: y
Removed /home/pj24001603/ku40000105/.local/share/jupyter/kernels/uv3.12
Removed /home/pj24001603/ku40000105/.local/share/jupyter/kernels/uv3.12
# You can confirm that the registered virtual environment has been deleted
(python3.12) [ku40000105@genkai0001 python3.12]$ jupyter kernelspec list
Available kernels:
  python3                  /home/pj24001603/ku40000105/work/tmp/python3.12/.venv/share/jupyter/kernels/python3
(python3.12) [ku40000105@genkai0001 python3.12]$