Open OnDemand
Last update: xx April, 2026
Available users
|
Kyushu Univ. users |
Academic users |
Non-academic users |
|---|---|---|
|
OK |
OK |
OK |
What you can do with Open OnDemand
Open OnDemand allows you to perform various operations on Genkai from a web browser.
- File manipulation: You can manipulate the files as login nodes and computation nodes from the web.
- Job execution and management: You can submit jobs to compute nodes and manage jobs.
- Shell access: You can use CUI to access the files as you do for SSH access.
- Launch applications: Various applications will be available from Open OnDemand.
- Virtual Desktop
- You can use a desktop environment launched on a compute node. This is suitable for running visualization software and similar applications.
- VSCode
- You can use the Linux server version of Visual Studio Code . You can edit files on Genkai directly. SSH connections using the local desktop version of VSCode can consume significant resources on the destination (Genkai), so we recommend using this server version. VSCode runs on the compute node but does not consume points.
- Jupyter
- You can use Jupyter, an interactive execution environment. Please also refer to this page.
- OpenFOAM
- You can submit batch jobs with the OpenFOAM environment pre-loaded.
- RStudio
- WHEEL
- Virtual Desktop
Login to Open OnDemand
Please access the following URL with your Web browser.
https://genkai-ood.hpc.kyushu-u.ac.jp/
For Username and Password, please enter your supercomputer account and corresponding password.
(In the initial state, you cannot log in because the password is not set. Please set them in the Application Portal.)
After entering the password, you will also need to enter the one-time password for two-factor authentication.
Two-factor authentication must be set for the first time of use.
After logging in, you will see the following screen.
You can access each function from the menu at the top.

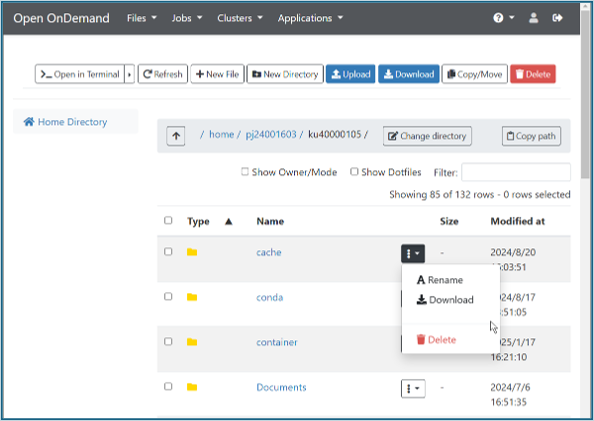
File operations (Files)
You can perform basic file operations such as creating and editing files and directories, uploading/downloading, etc.
Selecting "Home Directory" from the Files menu opens the file operations screen.
Operations on individual files and directories can be performed from the "3 dots + lower triangle" menu.
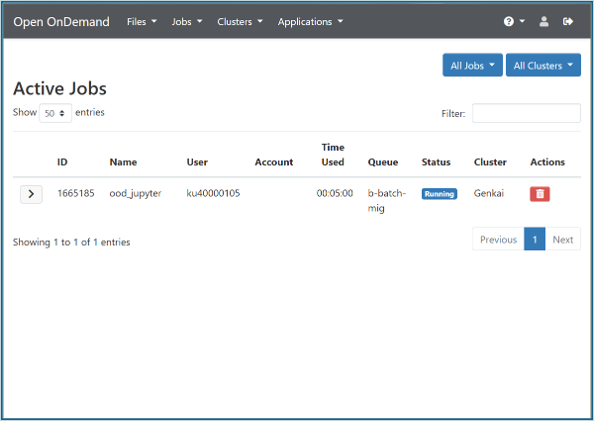
Running and managing jobs (Jobs)
You can submit jobs to compute nodes and manage jobs.
Selecting "Active Jobs" from the Jobs menu opens a confirmation screen for the current job.
You will get the same information as if you had run pjstat (pjstat2) on the login node.
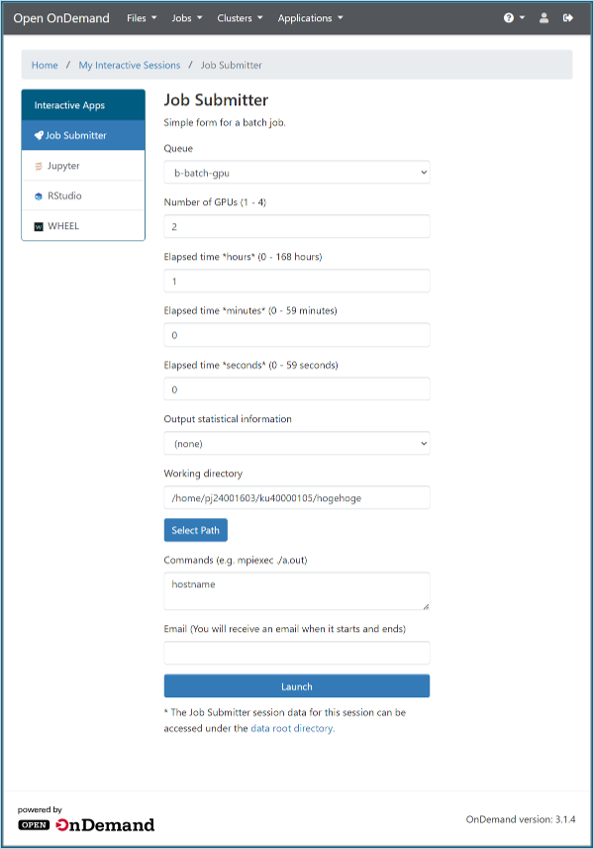
Selecting "Job Submitter" from the Jobs menu opens the job submission page.
You can submit a batch job using each computation node group.
Shell access (Clusters)
Selecting "Genkai Shell Access" from the Clusters menu opens a new window that allows CUI operations in the browser.
Shell operations similar to SSH access are available.

Launch the applications (Applications)
Various applications can be launched.
Currently, Virtual Desktop, VSCode, Jupyter (Jupyter Notebook), OpenFOAM, RStudio, and WHEEL can be started.
The following is an example of launching Juputer Notebook.
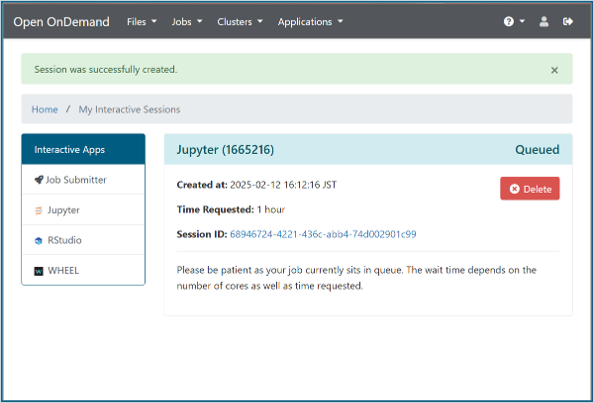
As in the Jobs Submitter, when you set up a job and press "Launch", the job will be launched and you will be redirected to the job management page.
(This screen can also be accessed from "My Interactive Sessoins" in the top menu of the "Jobs Submitter" page.)
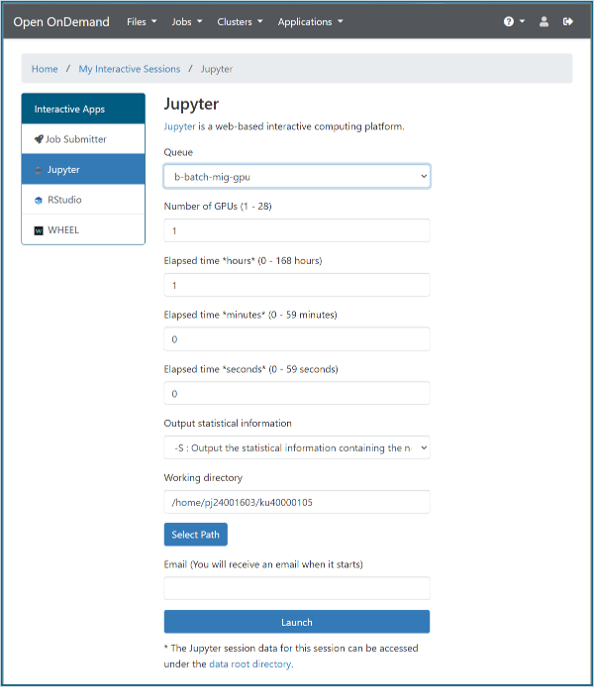
When the job starts, the "Connect to Jupyter" button appears.
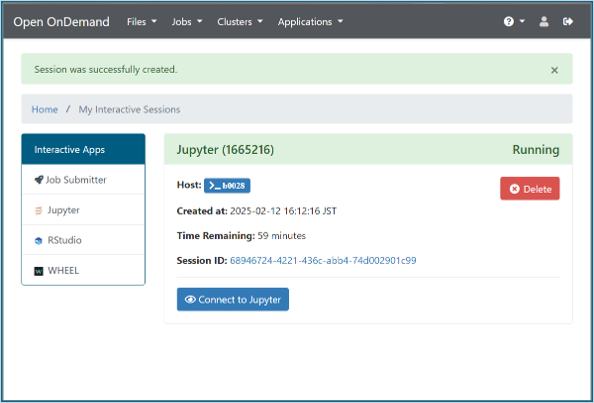
The button opens Jupyter Notebook in a new window.
Since points are consumed until the job is finished, please select "Shut Down" from the Jupyter Notebook menu, press "Delete" from the "My Interactive Sessoins" page, or delete from the "Active Jobs" page after use.
How to use the Python virtual environment on Jupyter
Prerequisites (Preparation)
You should have already installed Miniforge (mamba command available) following the instructions on the Python page.
Outline of the procedure
- prepare a virtual environment
- register the virtual environment to OOD using the ipython command
- start the registered virtual environment on OOD
example
1. prepare a virtual environment
Prepare a virtual environment according to the Python version available on OOD.
(It is possible that the versions do not have to match up to the finest version, but it has not been confirmed how much difference is acceptable.)
The ipykernel package must be installed in the virtual environment.
It would be easier to install ipykernel together at the time of mamba create, but it can be added later with the pip command.
The following is an example of creating a new virtual environment including scipy and ipykernel.
[ku40000105@genkai0001 ~]$ mamba create -n test_3.12.11_scipy2 python=3.12.11 pip scipy ipykernel

Looking for: ['python=3.12.11', 'pip', 'scipy', 'ipykernel']
(omit)
  Prefix: /home/pj24001603/ku40000105/miniforge3/envs/test_3.12.11_scipy2

  Updating specs:
   - python=3.12.11
   - pip
   - scipy
   - ipykernel
(omit)
[ku40000105@genkai0001 ~]$ mamba info -e

          mamba version : 1.5.12
# conda environments:
#
base                   /home/pj24001603/ku40000105/miniforge3
test_3.12.11_scipy2    /home/pj24001603/ku40000105/miniforge3/envs/test_3.12.11_scipy2
2. register the virtual environment to OOD using ipython command
With the virtual environment you want to register enabled, register the virtual environment using the ipython command.
The name specified in the --name argument will appear in the kernel list on Jupyter.
[ku40000105@genkai0001 ~]$ mamba activate test_3.12.11_scipy2
(test_3.12.11_scipy2) [ku40000105@genkai0001 ~]$ ipython kernel install --user --name=python_3.12.11_scipy2
Installed kernelspec python_3.12.11_scipy2 in /home/pj24001603/ku40000105/.local/share/jupyter/kernels/python_3.12.11_scipy2
(test_3.12.11_scipy2) [ku40000105@genkai0001 ~]$ jupyter kernelspec list
Available kernels:
  python3                  /home/pj24001603/ku40000105/miniforge3/envs/test_3.12.11_scipy2/share/jupyter/kernels/python3
  jupyter_py3.11           /home/pj24001603/ku40000105/.local/share/jupyter/kernels/jupyter_py3.11
  python_3.12.11_scipy2    /home/pj24001603/ku40000105/.local/share/jupyter/kernels/python_3.12.11_scipy2
The jupyter command is used to remove registered virtual environments.
(test_3.12.11_scipy2) [ku40000105@genkai0001 ~]$ jupyter kernelspec uninstall jupyter_py3.11
Kernel specs to remove:
  jupyter_py3.11        /home/pj24001603/ku40000105/.local/share/jupyter/kernels/jupyter_py3.11
Remove 1 kernel specs [y/N]: y
Removed /home/pj24001603/ku40000105/.local/share/jupyter/kernels/jupyter_py3.11
(test_3.12.11_scipy2) [ku40000105@genkai0001 ~]$ jupyter kernelspec list
Available kernels:
  python3                  /home/pj24001603/ku40000105/miniforge3/envs/test_3.12.11_scipy2/share/jupyter/kernels/python3
  python_3.12.11_scipy2    /home/pj24001603/ku40000105/.local/share/jupyter/kernels/python_3.12.11_scipy2
3. start the registered virtual environment on OOD
Start OOD by specifying the Python version for the registered environment.
After startup, you can select the registered virtual environment from the Notebook startup menu, so select it and start it.


Since scipy is installed, it can be confirmed that scipy-related processing can be performed.
It can be confirmed that module loading is not possible because pandas is not installed.

Note that neither scipy nor pandas is installed in the environment available from the beginning (Python 3 (ipykernel)), so neither module can be loaded and an error occurs.
This confirms that the virtual environment created in the above example was indeed usable.
